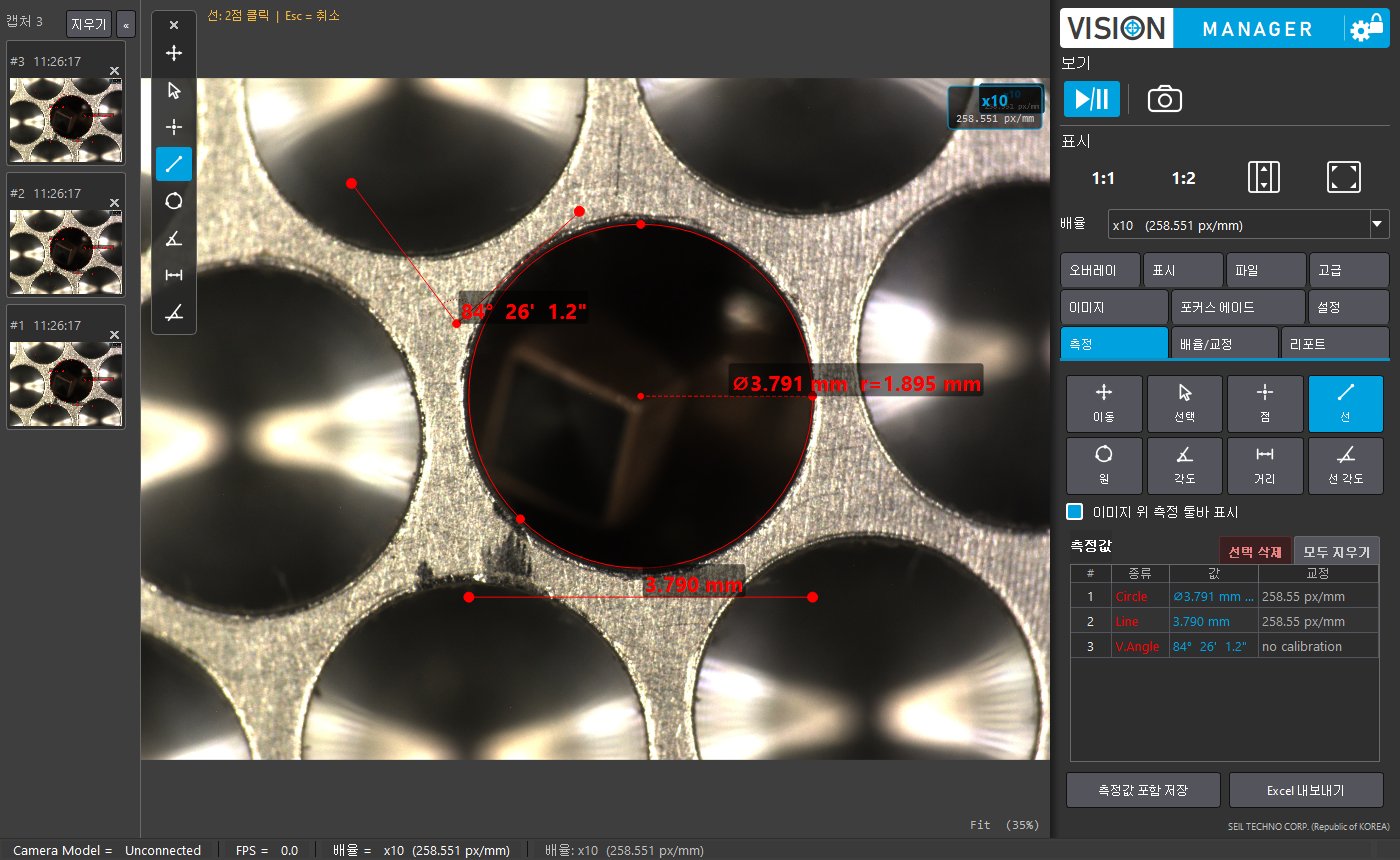
VISION-MANAGER는 현미경 카메라 영상을 보면서 이미지를 캡처하고, 화면에서 길이 · 원 · 각도를 측정하고, 결과를 이미지와 Excel 리포트로 남기는 소프트웨어입니다.
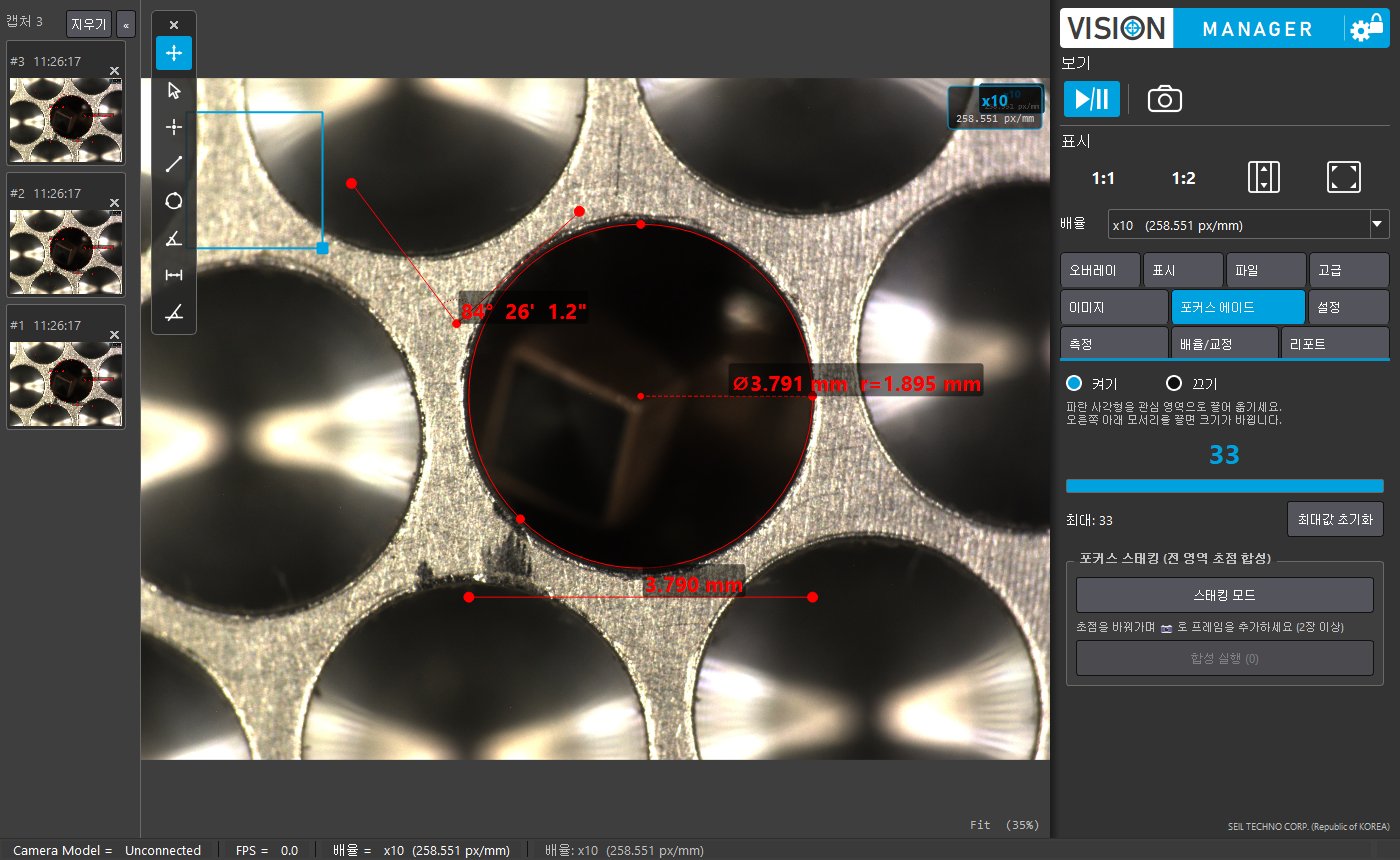
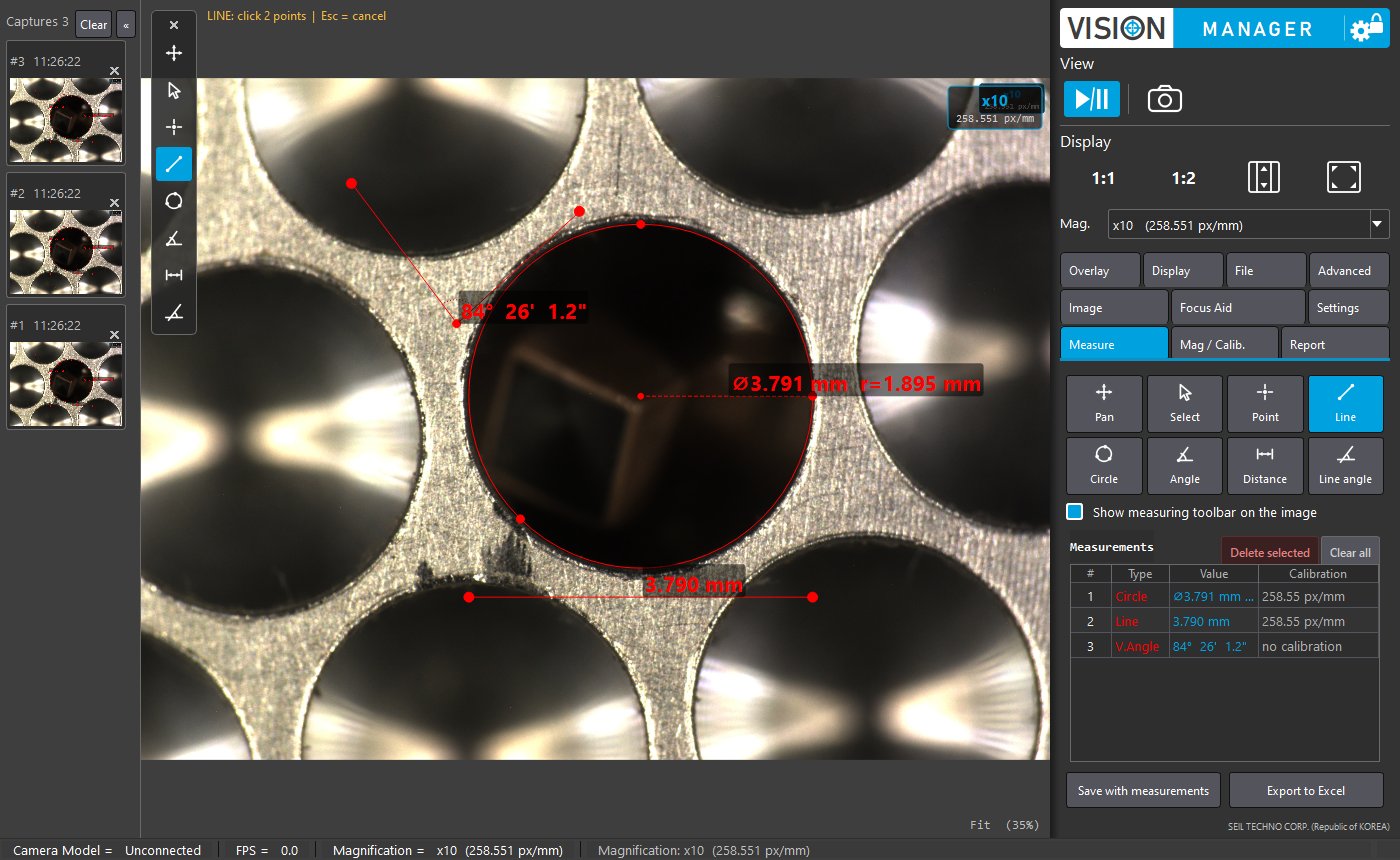
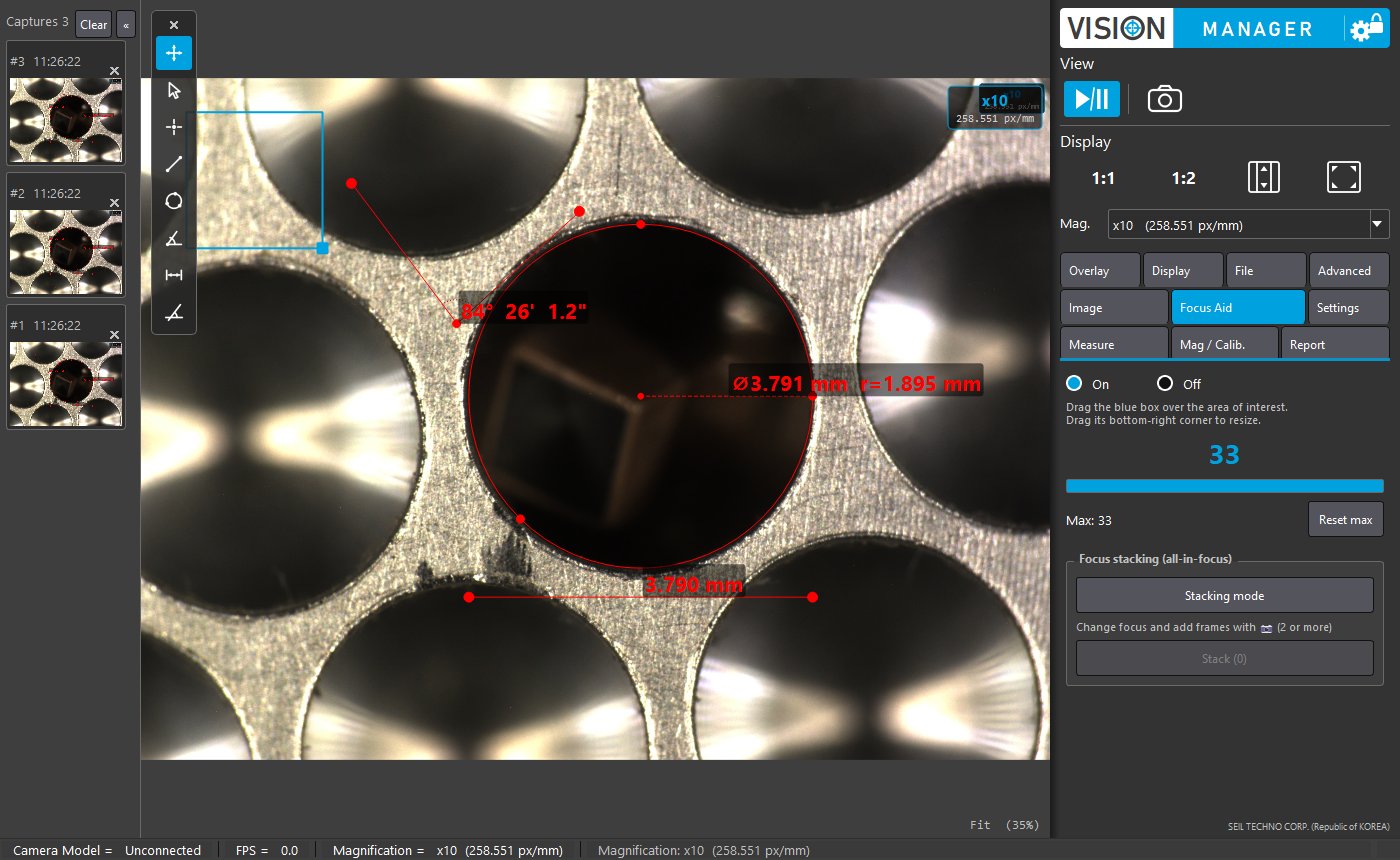
화면 배치는 Vision Engineering ViCapture와 같습니다. ViCapture를 쓰던 작업자는 같은 자리에서 같은 버튼을 찾을 수 있고, VISION-MANAGER에만 있는 측정 · 배율/교정 · 리포트 기능은 탭 세 번째 줄과 이미지 위 측정 툴바, 왼쪽 캡처 트레이에 있습니다.
라이브 영상 · 정지 · 1:1 / 1:2 / 창 맞춤 / 전체 화면 표시
명도 · 대비(게인) · 노출 · 감마, 자동 노출, 화이트 밸런스
점 · 선 · 원 · 각도 · 거리 · 선 각도 측정, mm 단위 결과표, Excel 내보내기
사각형 · 타원 · 화살표 · 텍스트 마크업, 십자선 · 배율 오버레이
포커스 에이드(선명도 막대)와 포커스 스태킹(전 영역 초점 합성)
리포트 세션(레시피 · Excel 템플릿), 관리자 잠금, 한국어 / English 화면
2. 시스템 요구사항
항목
요구사항
운영체제
Windows 10 / 11 (64비트)
메모리
8 GB 이상 권장
화면
1920 × 1080 이상 (Windows 배율 100 – 150 % 지원)
카메라
IDS USB3 카메라 (IDS peak 런타임 필요) 또는 USB 웹캠형(WDM) 카메라
리포트
Microsoft Excel 2016 이상 (Excel 템플릿 모드 사용 시)
3. 설치
VISION-MANAGER-v2.1-Setup.exe 를 관리자 권한으로 실행하고 안내에 따라 설치합니다.
IDS 카메라를 쓰는 경우, IDS 홈페이지에서 IDS peak 를 받아 먼저 설치합니다. 설치하지 않으면 카메라가 보이지 않습니다. WDM(웹캠형) 카메라는 별도 드라이버가 필요 없습니다.
설치가 끝나면 바탕화면과 시작 메뉴에 VISION-MANAGER 아이콘이 생깁니다.
이전 버전이 설치된 PC에서는 덮어쓰기로 업그레이드됩니다. 설정과 교정값은 유지됩니다.
ⓘ 설정 파일 위치: %APPDATA%\VISION_MANAGER · 배율 프리셋: %APPDATA%\MRS_core
4. 화면 구성
메인 화면 (측정 탭)
영역
설명
캡처 트레이 (왼쪽)
📷 로 캡처한 이미지가 최신순으로 쌓입니다. « 로 접을 수 있습니다.
측정 툴바 (이미지 왼쪽 위)
측정 도구를 바로 고릅니다. ✕ 로 숨기고 [측정] 탭에서 다시 켭니다.
이미지
라이브 또는 정지 영상. 휠로 확대, 드래그로 이동, 더블클릭으로 창 맞춤.
오른쪽 패널
로고 · 관리자 잠금 / 보기 / 표시 / 배율 / 탭 3줄 / 탭 내용
상태바
Camera Model · FPS · 배율 · 안내 메시지 · 리포트 세션
5. 카메라 연결
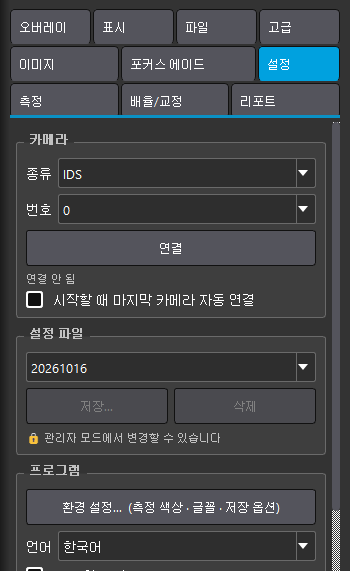
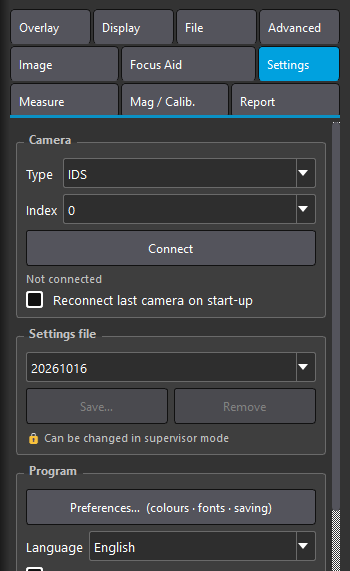
[설정] 탭
[설정] 탭 → 카메라 에서 종류(IDS / WDM)와 번호를 고르고 [연결]을 누릅니다.
한 번 연결되면 다음 실행부터 같은 카메라에 자동으로 연결됩니다 ("시작할 때 마지막 카메라 자동 연결").
설정 파일: 노출 · 게인 · 감마 등 카메라 설정을 이름을 붙여 저장하고, 고르면 바로 불러옵니다 (저장 · 삭제는 관리자 모드).
언어: 한국어 / English 를 고르고 프로그램을 다시 시작하면 바뀝니다.
6. 이미지 조정
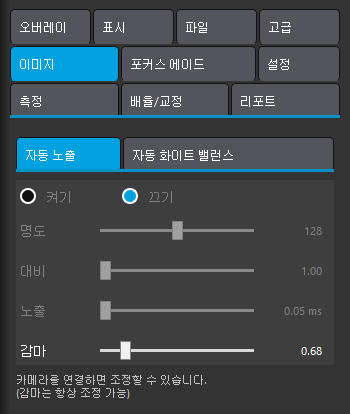
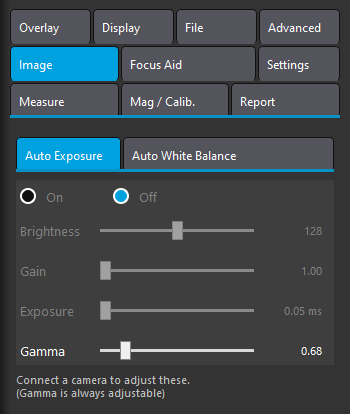
[이미지] 탭
항목
설명
자동 노출 켜기
명도(목표 밝기)를 맞추면 노출과 게인이 자동으로 따라갑니다.
자동 노출 끄기
대비(게인)와 노출을 직접 조정합니다.
대비
ViCapture 한글판과 같은 이름이며 실제로는 카메라 게인(Gain)입니다.
감마
중간 밝기를 조정합니다(1.00 = 보정 없음). 카메라 연결과 상관없이 항상 조정됩니다.
화이트 밸런스
켜기 = 계속 자동, 한 번 = 한 번만 맞춤, 끄기 = 마지막 값 유지
ⓘ 값 숫자를 클릭하면 직접 입력할 수 있습니다.
7. 보기와 표시
버튼
기능
▶/II
라이브 ↔ 정지 (파란색 = 라이브). 단축키 Space
📷
캡처하고 자동 저장. Shift+클릭 = 이름을 정해 저장. 단축키 Ctrl+S
1:1
화면 1픽셀 = 카메라 1픽셀
1:2
화면 1픽셀 = 카메라 2픽셀
창 맞춤
이미지를 창에 맞춤 (이미지 더블클릭도 같음)
전체 화면
전체 화면 ↔ 창. 단축키 F11, Esc
8. 캡처와 저장
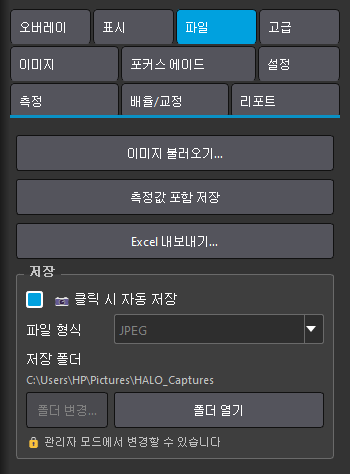
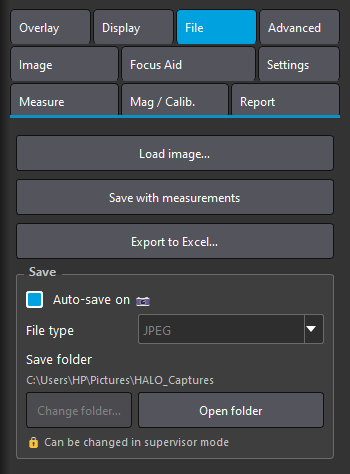
[파일] 탭
📷 를 누르면 화면에 보이는 측정선 · 마크업 · 십자선 · 배율 표시를 포함해 저장 폴더에 바로 저장되고, 썸네일이 왼쪽 트레이에 쌓입니다.
트레이 썸네일: 클릭 = 크게 보기, 더블클릭 = 새 탭으로 열어 측정 · 마크업, ✕ = 트레이에서만 제거.
[파일] 탭에서 이미지 불러오기, 측정값 포함 저장, Excel 내보내기, 자동 저장 · 파일 형식 · 저장 폴더를 설정합니다 (형식 · 폴더 변경은 관리자 모드).
9. 배율과 교정
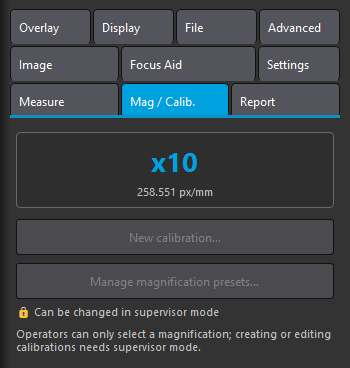
[배율/교정] 탭
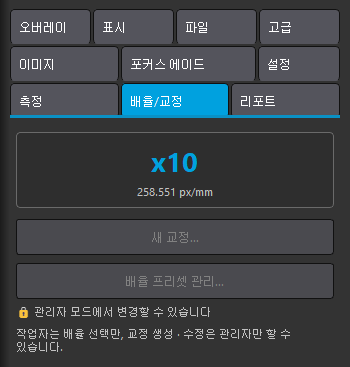
측정값을 mm로 보려면 먼저 패널 위쪽 [배율]에서 현재 대물렌즈 배율을 고릅니다. 선택한 배율은 이미지 오른쪽 위와 상태바에 표시됩니다.
새 교정: 관리자 모드에서 [배율/교정] → [새 교정…]. 눈금자 등 길이를 아는 대상을 찍고 두 점(또는 에지)을 지정해 px/mm 를 구한 뒤 배율 프리셋으로 저장합니다.
배율 프리셋 관리: 프리셋 이름 · 값을 고치거나 지웁니다.
ⓘ 교정값은 PC마다 따로 만듭니다. 현미경 · 카메라 조합이 바뀌면 다시 교정하십시오.
10. 측정
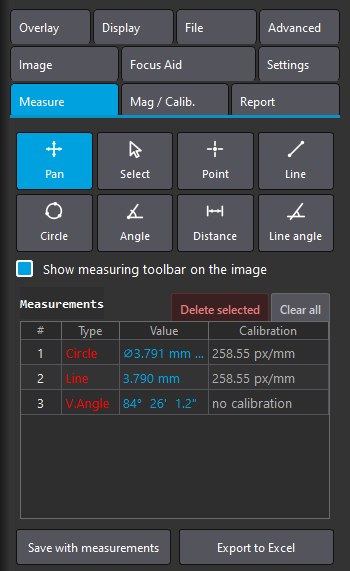
[측정] 탭
도구
사용법
단축키
이동
드래그로 화면 이동 (측정 안 함)
—
선택
측정선 · 라벨 · 마크업을 골라 옮기거나 Delete 로 지움
S
점
1곳 클릭
P
선
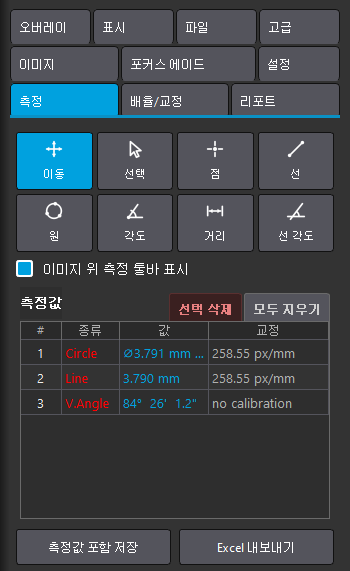
2점 클릭 → 길이
L
원
원둘레 위 3점 클릭 → 지름 · 반지름
C
각도
끝 → 꼭짓점 → 끝 3점 클릭
A
거리
측정된 객체 2개를 차례로 클릭 → 사이 거리
D
선 각도
선 2개를 차례로 클릭 → 사이 각도
G
측정 중 Esc 를 누르면 그리던 측정이 취소됩니다.
결과는 [측정] 탭 아래 표에 쌓입니다. [측정값 포함 저장] · [Excel 내보내기]로 기록합니다.
다른 탭으로 옮기면 그리기 도구는 [이동]으로 돌아갑니다.
11. 마크업 · 오버레이
[표시] 탭 (마크업)
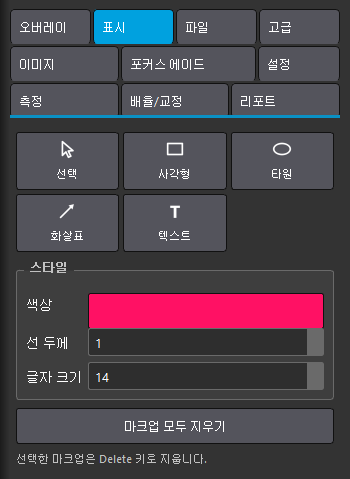
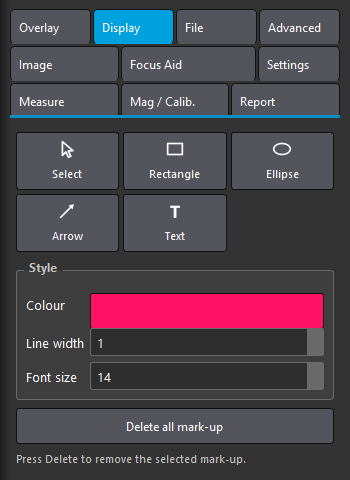
[표시] 탭: 사각형 · 타원 · 화살표 · 텍스트를 드래그나 클릭으로 그립니다. 색상 · 선 두께 · 글자 크기를 먼저 고르십시오.
[오버레이] 탭: 이미지 가운데 고정 십자선(색상 선택, 관리자 모드)과 배율 표시를 켜고 끕니다. 둘 다 저장 이미지에도 들어갑니다.
12. 포커스 에이드 · 포커스 스태킹
포커스 에이드 켜기
[포커스 에이드] → 켜기: 파란 사각형을 초점을 맞출 곳으로 끌어 옮기고(오른쪽 아래 모서리로 크기 조정) 초점을 돌리며 선명도 막대가 가장 길어지는 곳을 찾습니다.
포커스 스태킹: [스태킹 모드]를 켜고 초점을 바꿔가며 📷 로 2장 이상 찍은 뒤 [합성 실행]. 전 영역에 초점이 맞은 이미지가 새 탭과 트레이에 생깁니다.
13. 리포트
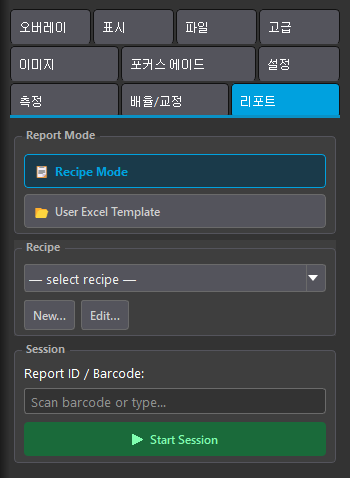
[리포트] 탭
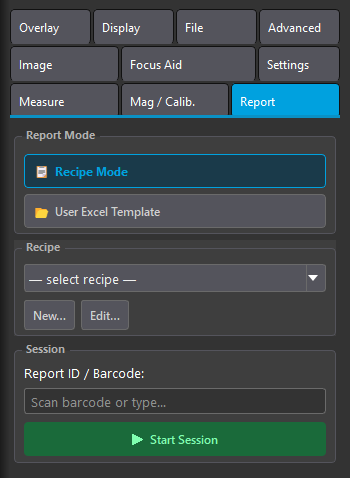
[리포트] 탭의 버튼은 영문으로 표시됩니다.
Recipe Mode: 레시피(리포트 열 구성)를 고르고 Report ID(바코드)를 넣은 뒤 [Start Session]. 📷 를 누를 때마다 현재 슬롯이 채워지고 [Add Slot]으로 다음 시료로 넘어갑니다. 마지막에 [Export Report]로 Excel 파일을 만듭니다.
User Excel Template: 고객 양식의 Excel 파일을 열고, 원하는 셀을 선택한 뒤 [Insert Image]로 현재 이미지를 그 셀에 넣습니다.
세션 중에는 왼쪽 캡처 트레이 자리에 리포트 슬롯이 표시됩니다.
14. 관리자 모드
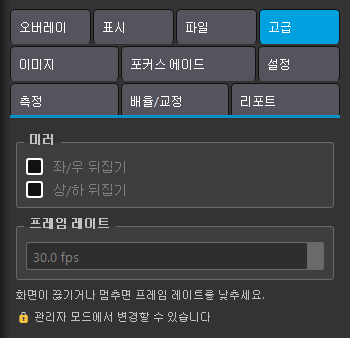
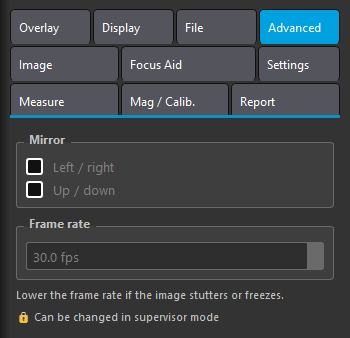
[고급] 탭 (잠금 상태)
오른쪽 위 자물쇠 버튼을 누르고 비밀번호를 입력하면 관리자 모드가 됩니다. 다시 누르면 잠기며, 프로그램을 다시 시작하면 항상 잠긴 상태로 시작합니다.
관리자만 할 수 있는 일
교정 생성 · 배율 프리셋 관리
미러(좌/우 · 상/하), 프레임 레이트 ([고급] 탭)
십자선 켜기 · 끄기 · 색상
저장 파일 형식 · 저장 폴더 변경
카메라 설정 파일 저장 · 삭제, 관리자 비밀번호 변경
ⓘ 기본 비밀번호는 Vision 입니다 (대소문자 구분). 납품 전에 [설정] → [관리자 비밀번호 변경…]에서 바꾸십시오. 비밀번호를 잊으면 %APPDATA%\VISION_MANAGER\settings.json 의 supervisor_pw_hash 값을 ""(빈칸)으로 지우면 기본값으로 돌아갑니다.
15. 단축키
키
기능
Space
라이브 / 정지
Ctrl+S
캡처 (📷)
Ctrl+Shift+S
측정값 포함 저장
Ctrl+O
이미지 불러오기
Ctrl+E
Excel 내보내기
F11
전체 화면
Esc
측정 취소 / 전체 화면 해제
Delete
선택한 측정 · 마크업 삭제
S P L C A D G
선택 · 점 · 선 · 원 · 각도 · 거리 · 선 각도 도구
Ctrl+Q
종료
16. 문제 해결
증상
확인할 것
카메라가 연결되지 않음
IDS peak 런타임 설치 여부, USB3 포트, 다른 프로그램(IDS peak Cockpit 등)이 카메라를 쓰고 있지 않은지 확인 후 [설정] → [연결]
영상이 끊기거나 멈춤
관리자 모드 → [고급] → 프레임 레이트를 낮춤
측정값이 mm로 안 나옴
[배율]에서 배율을 선택했는지 확인 (교정값 필요)
화면 글자가 잘림
Windows 디스플레이 배율 100 – 150 % 권장
관리자 비밀번호 분실
14장의 비밀번호 초기화 방법 참고
1. Introduction
VISION-MANAGER shows the live image from a microscope camera, captures images, measures lengths, circles and angles on screen, and records the results as images and Excel reports.
The layout follows Vision Engineering ViCapture, so ViCapture users find the same controls in the same places. Features unique to VISION-MANAGER — measuring, magnification/calibration and reports — sit in the third row of tabs, the measuring toolbar on the image and the capture tray on the left.
Live view, freeze, 1:1 / 1:2 / fit / full-screen display
Brightness, gain, exposure and gamma; auto exposure; white balance
Point, line, circle, angle, distance and line-angle measurement in mm, results table, Excel export
Rectangle, ellipse, arrow and text mark-up; crosshair and magnification overlays
Focus aid (sharpness meter) and focus stacking (all-in-focus image)
Report sessions (recipe or Excel template), supervisor lock, Korean / English UI
IDS USB3 camera (needs the IDS peak runtime) or a USB webcam-type (WDM) camera
Reports
Microsoft Excel 2016 or later (for Excel-template mode)
3. Installation
Run VISION-MANAGER-v2.1-Setup.exe as administrator and follow the wizard.
For IDS cameras, download and install IDS peak from the IDS website first; without it the camera is not detected. WDM (webcam-type) cameras need no extra driver.
The installer adds VISION-MANAGER to the desktop and the Start menu.
Installing over an earlier version upgrades it in place; settings and calibrations are kept.
Images captured with 📷, newest first. Collapse it with «.
Measuring toolbar (top-left of image)
Pick a measuring tool. Hide it with ✕; show it again from the Measure tab.
Image
Live or frozen image. Wheel to zoom, drag to pan, double-click to fit.
Right panel
Logo and supervisor lock / View / Display / Magnification / three rows of tabs / tab content
Status bar
Camera model · FPS · magnification · messages · report session
5. Connecting the camera
Settings tab
In Settings → Camera, choose the type (IDS / WDM) and index, then click Connect.
After the first successful connection the same camera reconnects automatically at start-up ("Reconnect last camera on start-up").
Settings file: save camera settings (exposure, gain, gamma …) under a name; selecting one loads it (saving and removing need supervisor mode).
Language: choose 한국어 / English and restart the program.
6. Image adjustment
Image tab
Setting
Description
Auto Exposure On
Set Brightness (the target level); exposure and gain follow automatically.
Auto Exposure Off
Adjust Gain and Exposure yourself.
Gain
Camera gain. (The Korean UI labels it 대비, as ViCapture does.)
Gamma
Adjusts mid-tones (1.00 = none). Always available, with or without a camera.
White balance
On = continuous, Once = one-shot, Off = keep the last values
ⓘ Click a value to type it in.
7. View and display
Button
Function
▶/II
Live ↔ freeze (blue = live). Shortcut Space
📷
Capture and auto-save. Shift+click = Save as… Shortcut Ctrl+S
1:1
One screen pixel per camera pixel
1:2
One screen pixel per two camera pixels
Fit
Fit the image to the window (or double-click the image)
Full screen
Full screen ↔ window. Shortcuts F11, Esc
8. Capturing and saving
File tab
Clicking 📷 saves the image — with the measurements, mark-up, crosshair and magnification badge you see on screen — straight to the save folder and adds a thumbnail to the tray.
Tray thumbnails: click = enlarge, double-click = open in a new tab to measure or mark up, ✕ = remove from the tray only.
The File tab loads images, saves with measurements, exports to Excel and sets auto-save, file type and save folder (type and folder need supervisor mode).
9. Magnification and calibration
Mag / Calib. tab
To get measurements in mm, first choose the current objective in Magnification at the top of the panel. The selection is shown at the top right of the image and in the status bar.
New calibration (supervisor mode): Mag / Calib. → New calibration…. Image a scale of known length, mark two points (or edges) to get px/mm, then save it as a magnification preset.
Manage magnification presets: rename, edit or delete presets.
ⓘ Calibrations are per PC. Recalibrate whenever the microscope / camera combination changes.
10. Measuring
Measure tab
Tool
How to use
Key
Pan
Drag to move the view (no measuring)
—
Select
Pick a measurement, label or mark-up to move it; Delete removes it
S
Point
Click once
P
Line
Click 2 points → length
L
Circle
Click 3 points on the edge → diameter and radius
C
Angle
Click end → vertex → end
A
Distance
Click two measured objects → distance between them
D
Line angle
Click two lines → angle between them
G
Press Esc to cancel a measurement in progress.
Results collect in the table on the Measure tab. Use Save with measurements or Export to Excel to record them.
Switching to another tab returns the drawing tool to Pan.
11. Mark-up and overlays
Display tab (mark-up)
Display tab: draw rectangles, ellipses, arrows and text by dragging or clicking. Choose the colour, line width and font size first.
Overlay tab: turn the fixed centre crosshair (colour selectable, supervisor mode) and the magnification badge on or off. Both are included in saved images.
12. Focus aid and focus stacking
Focus aid on
Focus Aid → On: drag the blue box to the area to focus on (resize from its bottom-right corner) and adjust focus until the sharpness bar is at its longest.
Focus stacking: turn on Stacking mode, capture 2 or more frames with 📷 at different focus settings, then click Stack. The all-in-focus result opens in a new tab and the tray.
13. Reports
Report tab
The Report tab works as follows.
Recipe Mode: choose a recipe (the report column layout), enter the Report ID / barcode and click Start Session. Each 📷 fills the current slot; Add Slot moves to the next sample. Export Report writes the Excel file.
User Excel Template: open the customer's Excel form, select a cell and click Insert Image to place the current image there.
During a session the report slots replace the capture tray on the left.
14. Supervisor mode
Advanced tab (locked)
Click the lock button at the top right and enter the password to enter supervisor mode. Click it again to lock. The program always starts locked.
Mirror (left/right, up/down) and frame rate (Advanced tab)
Crosshair on/off and colour
Changing the file type and save folder
Saving / removing camera settings files, changing the supervisor password
ⓘ The default password is Vision (case-sensitive). Change it before delivery in Settings → Change supervisor password…. If it is forgotten, clearing supervisor_pw_hash to "" in %APPDATA%\VISION_MANAGER\settings.json restores the default.
15. Keyboard shortcuts
Key
Function
Space
Live / freeze
Ctrl+S
Capture (📷)
Ctrl+Shift+S
Save with measurements
Ctrl+O
Load image
Ctrl+E
Export to Excel
F11
Full screen
Esc
Cancel measurement / leave full screen
Delete
Delete selected measurement or mark-up
S P L C A D G
Select · Point · Line · Circle · Angle · Distance · Line angle
Ctrl+Q
Quit
16. Troubleshooting
Problem
What to check
Camera does not connect
IDS peak runtime installed, USB3 port, no other program (e.g. IDS peak Cockpit) using the camera; then Settings → Connect